Thursday, August 11, 2011

POP it like it's hot!

Jalapeño Popper Grilled Cheese Sandwich
This jalapeño popper grilled cheese sandwich was DELISH-ious!!!!!!  Made with homegrown jalapeño peppers :)  We both have a love for the hott & spicy so this was right up our alley.  Next time I'll serve it with some creamy soup of some sort...
Ingredients per sandwich
  • 2 jalapeño peppers, cut in half lengthwise and seeded
  • 2 slices sour dough bread
  • 1 tablespoon butter, room temperature
  • 1 tablespoon cream cheese, room temperature
  • 1/4 cup jack and cheddar cheese, shredded
  • 1 tablespoon tortilla chips, crumbled
Directions
  1. Place the peppers on a baking sheet with the cut side facing down.
  2. Place the baking sheet on the top shelf in the oven and broil until the outer layer of the skin has blackened, about 8-14 minutes.
  3. Place the peppers in a zip-lock bag or other sealable container, seal and let them cool until you can handle them, about 20 minutes.
  4. Remove the skins from the peppers. The skins should easily "pinch" off.
  5. Assemble sandwich and grill until golden brown and the cheese has melted, about 2-3 minutes per side.

Wednesday, July 13, 2011

Father's Day Breakfast: Ultimate Melt-in-Your-Mouth Pancakes

We celebrated most of Father's Day weekend 2011 at the ballpark for Allstars but after breakfast Sunday we spent our Father's Day driving around in the 2011 Jeep Wrangler I rented.  We hit up Tannehill and then went to Mom & Dad's for Dreamland ribs, yum!!  It was the perfect day to spend the day with family :)

Ingredients:
2 cups Bisquick
1 cup milk
1 tablespoon sugar
2 tablespoons lemon juice
2 teaspoons baking powder
2 eggs

The lemon juice and baking powder provide a little more “lift” in these pancakes, making them lighter and fluffier than most.
  1. Heat griddle or skillet over medium-high heat or electric griddle to 375°F; grease with cooking spray. (Surface is ready when a few drops of water sprinkled on it dance and disappear.)
  2. Stir all ingredients with a wire whisk or fork just until the ingredients are moistened & blended. Pour by slightly less than 1/4 cupfuls onto hot griddle.
  3. Cook until edges are dry. Turn; cook until golden. To keep warm, place in single layer on cookie sheet. Cover with aluminum foil, and place in 200°F oven up to 10 minutes.

Monday, June 13, 2011

Ohh myy gosh ... SO GOOD!!

Okra isn't just for frying or gumbo anymore! This recipe we stumbled across on Southern Living's site simply ROCKS your tastebuds.  This is a must try if you are an okra lover.  I was in charge of the gril while Jonjon snuck in some extra study time and mine came out a little more burned "delicately charred," a phrase we have adopted from the authors of "Just Married & Cooking."  Nonetheless they were sooo good!

Peppery Grilled Okra With Lemon-Basil Dipping Sauce
Ingredients
  • Cheesecloth or coffee filter*
  • 1 (32-oz.) container plain low-fat yogurt*
  • 1/4 cup chopped fresh basil
  • 2 tablespoons lemon juice
  • 1/2 teaspoon minced garlic
  • 1/4 teaspoon sugar
  • 1 1/2 teaspoons salt, divided
  • 1 1/4 teaspoons freshly ground pepper, divided
  • 2 pounds fresh okra, trimmed
  • 2 tablespoons olive oil
  • Garnish: freshly ground pepper
Preparation
  • 1. Line a wire-mesh strainer with 3 layers of cheesecloth or 1 (12-cup) coffee filter. Place strainer over a bowl. Spoon yogurt into strainer. Cover and chill 24 hours. Remove yogurt, discarding strained liquid. *(we substitued 16oz of plain Greek yogurt and it turned out just fine, just a helpful tip if you don't have 24 hours for your tastebuds to sit on hold ;)
  • 2. Preheat grill to 400° to 450° (high) heat. Combine strained yogurt, basil, next 3 ingredients, 1/2 tsp. salt, and 1/4 tsp. pepper. Cover and chill until ready to serve.
  • 3. Toss together okra, olive oil, and remaining 1 tsp. salt and 1 tsp. pepper in a large bowl.
  • 4. Grill okra, covered with grill lid, over 400° to 450° (high) heat 2 to 3 minutes on each side or until tender. Cool 5 minutes.
  • 5. Transfer okra to a serving dish, and serve with dipping sauce. Garnish, if desired.


Saturday, June 11, 2011

These muffins are banana! B-a-n-a-n-a!

Ok, so we are a couple of Claire Robinson snobs... at least we admit it ;)  If you have yet to check out her show, "5 Ingredient Fix" on Food Network I suggest you set your Tivo, DVR, etc. Her recipes make a big flavor bang without a lot of buck at the grocery store.  Recipes with lots of ingredients make people nervous, including me, and the more you need the more likely you are to forget one or more. You will notice several of her recipes showcased in our blog from time to time.

A few nights ago I pre-made muffins for our morning breakfast.  Every since I discovered this recipe called for "ripe" bananas I was all over it! We had a whole bunch of neglected very ripe bananas from the last Sam's trip that never made it into the snack rotation and if you know me personally I hate to waste anything. I even drove to the grocery store that night at 9:00pm to get "self-rising" flour because we were out - I was just that excited and bent on making them.


Brown Butter Banana Muffins: Yield 12 muffins

1/4lb (1 stick) unsalted butter
4 ripe bananas
1/3 cup raw agave syrup or honey
1 large egg
1 3/4 cups self-rising flour

Preheat the oven to 375F.

Line a 12-cup muffin tin with paper muffin liners.

Put the butter in a small saucepan or skillet and melt over medium heat. Continue cooking, stirring occasionally, until the milk solids have turned a nutty golden brown and remove from the heat and let cool.

Peel the bananas and mash into a large bowl with fork until liquefied. Add the honey (what we had on hand) and egg and stir well; pour in the butter and whisk until completely combined. Add the flour and, with a rubber spatula, fold it into the wet ingredients until just combined; do not over mix.  With an ice cream scoop, evenly divide the batter among the muffin tin cups.

Bake in the center of the oven until golden brown and the tops spring back when pressed, about 25 minutes. Cool for 5 minutes in the muffin tin; transfer the muffins to a rack to cool completely. Serve warm or at room temperature.

Note: To make self-rising flour, add 1 1/2 teaspoons baking powder and 1/2 teaspoon of salt to 1 cup all-purpose flour.

What to toss in if you have it:
Chopped toasted pecans will add a nice crunch; or Claire also reccomends a smear of cream cheese on a warm muffin, heaven!

5 Ingredient Fix - Easy, Elegant, and Irresistible Recipes, Claire Robinson, Host of 5 Ingredient Fix [October 2010]

Thursday, June 9, 2011

Pizza, Pizza!

Homemade Pizza is so easy and just as long as you don't take yourself too seriously it's fun too!  The dough is never going to be perfect because we all don't have the time to go and study Domino's secrets in our spare time.  This last one we made was out of this world good!  Making it at home we can put as little or as much of the good stuff that we want on it or half n half since Jonjon doesn't really share my ridiculous love of olives (not picky, love them all equally the same).  In preparation preheat the oven to 450°F for at least 30 minutes, preferably an hour.

We bought our dough from Publix for $1.99.  Flatten it with your hands on a slightly floured work surface. Starting at the center and working outwards, use your fingertips to press the dough to 1/2-inch thick.  Turn and stretch the dough until it will not stretch further.  You can also use a kitchen roller (floured) but if you are like us and don't own one a wine bottle works just fine ;)  Let the dough relax 5 minutes and then continue to stretch it until it reaches your desired diameter.  Use your palm to flatten the edge of the dough where it is thicker. You can pinch the edges if you want to form a lip.  We've also made stuffed crust before too and it doesn't take much to place string cheese along the edges and roll the dough over it.  Lightly sprinkle your baking sheet with Italian bread crumbs or corn meal works too.  Too prevent the dough from getting soggy from the toppings you can brush a small amount of olive oil on it, use your finger tips to press down and make dents along the surface of the dough to prevent bubbling. Let rest another 5 minutes.  Spoon on the tomato sauce (we enjoy the 7-herb variety), sprinkle with cheese, and place your desired toppings on the pizza - fresh basil curls are a must for us.  Bake pizza until browned and the cheese is golden, about 10-15 minutes, and Presto!  Enjoy :)

5.21.2011 Summer in the South

Nothing screams summer in the South like plump, juicy tomatoes!  Take advantage of summer’s vibrant bounty from farmers’ markets, local farm stands, or even your own backyard if you happen to have a husband with a green thumb like my Jonjon.  Me... I'm just in charge of decorating our rustic garden and finding new recipes to make with our yummy, fresh ingredients.


We recently made another trip back to Pepper Place Market with lil C in tow to meet up with a good friend to take in a cooking demo, book signing and shop for our ingredient of the day - green tomatoes!  Newlyweds Brooke Parkhurst and James Briscione (two-time champion of the Food Network's Chopped) wrote a new his-and-her cookbook "Just Married & Cooking", in hopes of helping young couples learn their way around the kitchen, which was right up our alley.  Our signed copy now sits in on an easel in our kitchen :)

Just Married and Cooking jacket image.JPG

Pepper Place Market, tasting


You can check out Brooke & James' website at http://justmarriedandcooking.com/.  We'll def. be making something from their book soon, maybe this weekend if we can sneak in a trip to Pepper Place between all lil C's baseball games and Jonjon's studies :)  In the meantime, enjoy this recipe from one of our favorite Food Network stars, Claire Robinson of 5-Ingredient Fix!  The green tomatoes we purchased at Pepper Place that very day star.


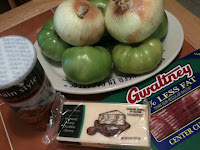
Green Tomato and Vidalia Onion Gratin

Claire Robinson

Ingredients

  • 1/4 pound bacon
  • 1 cup fresh bread crumbs (we cheated & didn't use fresh bread crumbs... won't make that mistake again! Go for the fresh if you can)
  • 2 large Vidalia onions, peeled and sliced into 1/4-inch thick rounds
  • 4 large green tomatoes, sliced 1/4-inch thick
  • Kosher salt and freshly cracked black pepper
  • 6 ounces sharp white Cheddar, grated, about 1 1/2 cups

Directions

Preheat the oven to 350 degrees F.

Render bacon in a large skillet over medium heat. Transfer the cooked bacon to a paper towel lined plate. Add the bread crumbs to a small bowl. Remove 2 tablespoons of the bacon fat from the skillet and stir into the bread crumbs. Add the onion rounds to the skillet in batches and cook, without breaking the round slices apart, until there is some golden color, about 5 to 6 minutes per side.

To assemble the gratin, overlap the green tomato slices in 1 row in a large baking dish, about 9 by 11 inches. Next, make a row slightly overlapping of the partially cooked onion rounds, being careful to keep the slices intact. Repeat steps until all tomatoes and onions are used. Season tomatoes and onions lightly with salt and heavily with pepper. Crumble the bacon over the vegetables; sprinkle the grated Cheddar over the top followed by the bread crumbs. Bake until the cheese is bubbly, about 30 to 45 minutes. If the top is getting too brown, loosely cover with foil.


Monday, April 11, 2011

Grilled Cheesy Corn

It has literally been forever since we've posted, oops! I assure you we've been heating up the kitchen but left with little time to share.  I don't have much time to gloat right now but I must say married life and my sweet husband ROCKS!!! I love that we love to cook together and make time for it as much as we can during even the busiest of weeks.  We follow "plainchicken.blogspot.com" (we recommend you do too ;) and we have been so wrapped up in the awesome recipes there we have been a lil lazy in going out to find our own to try. In the current issue of Southern Living I found a must try for our "date night" cookout for 2 this past Saturday night.
Grilled Cheesy Corn
Preheat grill to 350 to 400 (medium high heat).  Soak corn in cold salted water to cover 10 minutes then drain.  The recipe calls for fresh corn, removing and discarding silks and tying husks together with kitchen string to form a handle. However we used frozen corn and it turned out perfectly.  Grill corn covered with grill lid, 15 minutes or until golden brown, turning occasionally.  Remove from grill, brush corn with melted butter; sprinkle with salt, chili powder, paprika, and grated Parmesan cheese.  Serve with fresh lime wedges.  OMG! Heaven in my mouth!!